QuickBooks Desktop allows businesses to create invoices, print reports, email forms, and save important accounting documents as PDF files. However, these tasks can become difficult when QuickBooks displays the “Missing PDF Component” message or reports that a component required to create PDF files is unavailable.

The QuickBooks Missing PDF Component error can prevent users from saving invoices, printing transactions, exporting reports, or attaching PDF documents to emails. In many cases, the issue is related to Windows printing components, Microsoft XPS Document Writer, QuickBooks PDF settings, or user permissions—not necessarily a damaged company file.
Data Service Team shares practical accounting software troubleshooting resources at Data service Team. You can also read our dedicated guide to QuickBooks Missing PDF Component for additional troubleshooting details.
This guide takes a diagnostic approach: identify where PDF creation is failing, apply the appropriate repair, and test the result before making more significant changes.
What Does the QuickBooks Missing PDF Component Error Mean?
QuickBooks Desktop depends on Windows printing and document-generation components to process certain PDF and printing operations. Microsoft XPS Document Writer is one of the Windows components involved in this workflow.
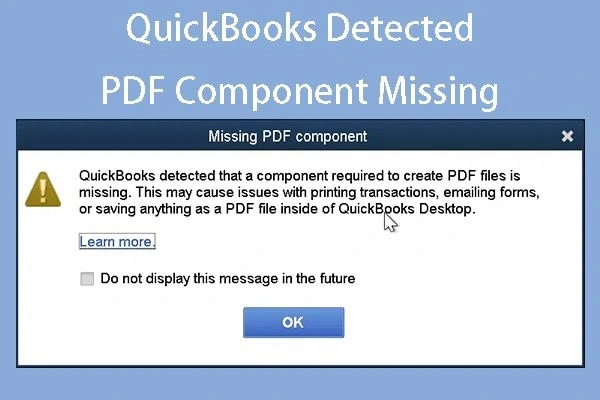
When a required component is disabled, unavailable, damaged, or inaccessible because of permissions, QuickBooks may be unable to complete a PDF-related task.
You might encounter messages such as:
QuickBooks detected that a component required to create PDF files is missing.
Missing PDF file component.
Unable to save as a .PDF file.
QuickBooks could not save your form or reports as a PDF.
PDF Converter shows offline.
There is a problem connecting to the currently selected printer.
These messages can appear when printing transactions, saving invoices, emailing forms, or generating accounting reports.
Important: This article focuses on QuickBooks Desktop on Windows. QuickBooks Online uses a browser-based printing workflow, so its troubleshooting process may be different.
Common Causes of QuickBooks PDF Component Problems
Understanding the likely source of the issue can prevent unnecessary changes to your computer.
1. Microsoft XPS Document Writer Is Disabled
QuickBooks uses parts of Microsoft's XPS Document Writer technology during certain PDF operations. If this Windows feature is disabled or unavailable, PDF creation may fail.
2. QuickBooks Desktop Needs an Update
An older QuickBooks release may have compatibility or printing-related problems. Updating the application can help restore normal functionality when a known software issue is involved.
3. QuickBooks PDF and Print Components Are Damaged
A printing-related component or configuration may become damaged after an incomplete update, software repair, or unexpected system interruption.
4. Windows TEMP Folder Permissions Are Incorrect
QuickBooks uses temporary folders while processing some printing and PDF operations. When the Windows account cannot access the required temporary files, saving documents may fail.
5. Print Spooler Is Not Running Properly
Windows Print Spooler manages printing requests. If the service is stopped or not configured correctly, QuickBooks may have difficulty completing print and PDF tasks.
6. A Transaction Template Is Causing the Problem
Sometimes the problem affects only one invoice, sales form, or transaction template rather than every PDF operation. A damaged or problematic template may be responsible.
7. Security Software Is Blocking an Operation
Antivirus or security software may restrict access to files or printing components. This should be investigated carefully rather than disabling computer protection permanently.
How to Fix QuickBooks Missing PDF Component Error
Before starting, close QuickBooks Desktop and save any other open work. If you are working on a business computer or shared accounting environment, involve your system administrator before changing Windows features, permissions, or services.
Solution 1: Run the QuickBooks Print & PDF Repair Tool
The QuickBooks Print & PDF Repair Tool is a useful first step because it is designed to address common PDF and printing problems in QuickBooks Desktop.
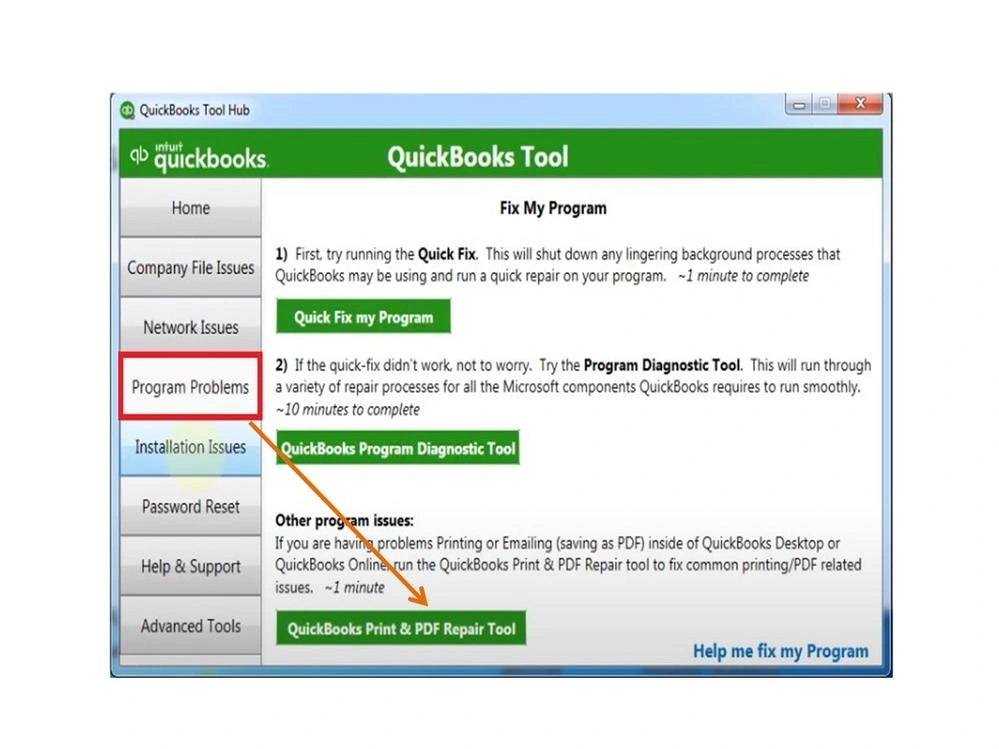
Follow these steps:
Close QuickBooks Desktop.
Download the latest QuickBooks Tool Hub from the official Intuit website.
Open the downloaded installer and follow the installation instructions.
Launch QuickBooks Tool Hub.
Select Program Problems.
Choose QuickBooks Print & PDF Repair Tool.
Allow the repair process to finish.
Reopen QuickBooks Desktop.
Try saving a form or report as a PDF.
The repair process may take about a minute. Test the original operation again before moving to another solution.
For official instructions, see Intuit's guide to fixing PDF and print problems in QuickBooks Desktop.
Solution 2: Update QuickBooks Desktop
An outdated QuickBooks release can contribute to software compatibility and printing problems. Check for available updates before changing Windows components.
Open QuickBooks Desktop.
Select Help from the top menu.
Choose Update QuickBooks Desktop.
Open the Update Now tab.
Select Get Updates.
Wait for the update process to finish.
Close and reopen QuickBooks.
Follow any installation prompts that appear.
After updating, try creating a PDF again.
For best results, download QuickBooks updates and installation files from official Intuit sources.
Solution 3: Enable Microsoft XPS Document Writer
This step is particularly important when the error appears on Windows 11 or when the XPS printer is missing from the available printer list.
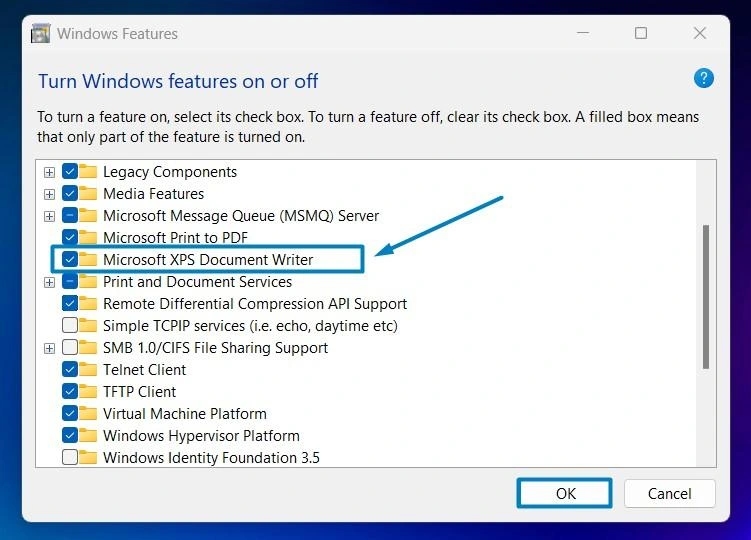
Open the Windows search box.
Type Control Panel and open it.
Select Programs.
Open Turn Windows features on or off.
Find Microsoft XPS Document Writer.
Check the box if the feature is disabled.
Select OK.
Restart the computer if Windows requests it.
After restarting, open QuickBooks and test the PDF operation.
If the XPS feature is already enabled, do not repeatedly toggle Windows features without a reason. Continue with the diagnostic steps below.
Solution 4: Test XPS Document Writer Outside QuickBooks
This test helps determine whether the problem is limited to QuickBooks or also affects Windows printing.
Open Notepad.
Type a short test message.
Select File, then Print.
Choose Microsoft XPS Document Writer.
Select Print.
Enter a filename and save the XPS document to your desktop.
Open the saved file to verify that it was created successfully.
What the result tells you:
If the XPS test works, Windows can complete this basic document-printing operation. Continue investigating QuickBooks settings and components.
If the XPS printer is missing or the test fails, the issue may be related to Windows features, printer configuration, or permissions.
If XPS printing fails outside QuickBooks, contact your IT administrator or Microsoft support before making deeper system changes.
Solution 5: Review TEMP Folder Permissions
QuickBooks may need access to temporary files while creating or processing documents. Incorrect permissions can interfere with this work.
To inspect the TEMP folder:
Press Windows + R.
Enter %TEMP% and press Enter.
Wait for the temporary folder to open.
Right-click an empty area and select Properties.
Open the Security tab.
Review the permissions for the Windows account and relevant user groups.
Confirm that the account running QuickBooks has the access required to work with temporary files.
Intuit's troubleshooting instructions include reviewing Full Control permissions in the TEMP folder. However, permissions should be changed carefully. Ask your system administrator to confirm the appropriate access rather than granting broad permissions to every user without review.
After correcting any confirmed permission issue, reopen QuickBooks and test PDF creation.
Solution 6: Check the Windows Print Spooler Service
The Print Spooler service helps Windows process printing requests. If the service is stopped or its startup setting is incorrect, printing-related operations may fail.
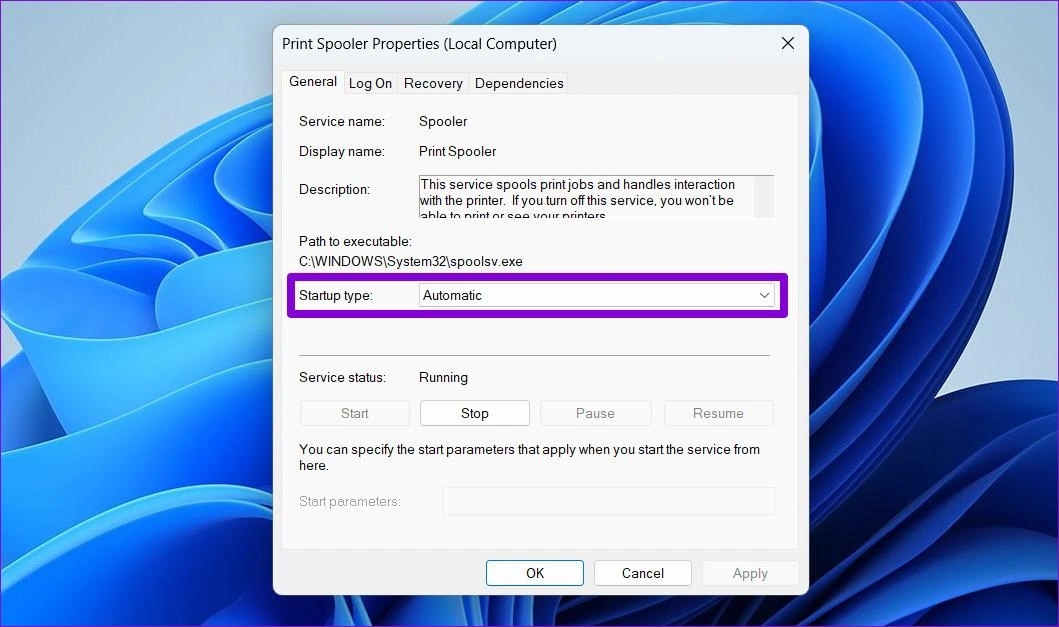
Right-click the Windows Start button.
Select Run.
Type services.msc and press Enter.
Find Print Spooler in the services list.
Right-click it and select Properties.
Check the Startup type setting.
Set it to Automatic if appropriate.
Select Apply, then OK.
If the service is stopped, select Start.
Close the Services window and test printing from QuickBooks again.
If the service repeatedly stops or displays an error, investigate the underlying Windows printer or driver problem instead of repeatedly restarting the service.
Solution 7: Try a Different Form Template
If the PDF error happens only with a particular invoice, estimate, or sales form, the template may be contributing to the problem.
To test this possibility:
Open the affected transaction.
Make a note of the template currently being used.
Create or select a different available template.
Apply the new template to a test transaction.
Try saving the document as a PDF.
If the new template works, the issue may be connected to the original form layout or template configuration.
Do not overwrite important custom templates without keeping a backup or confirming that the replacement meets your business requirements.
Solution 8: Review Antivirus and Security Software Settings
Security software can sometimes interfere with document creation or block access to printing-related files.
Instead of permanently disabling antivirus protection, take a controlled approach:
Check whether your security software has recently blocked a QuickBooks or Windows printing process.
Review its protection history or quarantine list.
Confirm that legitimate QuickBooks program files have not been incorrectly restricted.
Ask your IT administrator or security provider to review any required application exceptions.
Restore normal protection after testing.
Never download replacement PDF components from unknown websites or add broad security exclusions simply to bypass an error message.
Solution 9: Repair QuickBooks Installation When Other Fixes Fail
If the issue continues after checking the PDF repair tool, XPS Document Writer, permissions, and Print Spooler, the QuickBooks installation itself may need attention.
Before proceeding:
Create a current backup of your company file.
Close QuickBooks and other open applications.
Confirm that you have the correct QuickBooks installation media or official download information.
Use the appropriate Windows or QuickBooks repair procedure.
Follow the official installation or repair instructions.
Restart the computer.
Open QuickBooks and test PDF creation.
A repair or reinstall should not be the first troubleshooting step. Avoid deleting program folders or changing system DLL files manually. If the application needs to be reinstalled, verify your license and product information first.
How to Identify Whether the Problem Is QuickBooks or Windows
The following comparison can help narrow down the source before you apply more advanced troubleshooting.
What you observe
XPS printer is missing
Notepad cannot print to XPS
XPS works, but QuickBooks PDF fails
Only one invoice or form fails
QuickBooks cannot access temporary files
Printing requests remain stuck
Error continues after all checks
What to investigate
Windows optional features
Windows printing configuration
Transaction template
TEMP folder permissions
Print Spooler service
QuickBooks installation or specialist support
This approach is more useful than changing several unrelated settings at the same time. Test one change at a time so you can identify which action actually resolves the problem.
How to Prevent QuickBooks PDF Component Errors
A few routine checks can reduce the chances of repeated PDF and printing problems.
Keep QuickBooks Desktop updated with supported releases.
Install Windows updates through the normal Windows update process.
Make sure Microsoft XPS Document Writer is available when required.
Keep printer drivers current using trusted manufacturer or Windows sources.
Avoid changing Windows printer permissions without understanding the effect.
Maintain appropriate access to the TEMP folder.
Use the QuickBooks Print & PDF Repair Tool when a relevant PDF or printing problem appears.
Back up company files before major application repairs or reinstallations.
Review antivirus alerts when legitimate QuickBooks operations are blocked.
Preventive maintenance cannot eliminate every software issue, but it can make troubleshooting easier and reduce avoidable interruptions.
Frequently Asked Questions
1. Why does QuickBooks say the PDF component is missing?
QuickBooks may display this message when it cannot access the Windows printing or document-generation components required for a PDF operation. Disabled XPS functionality, damaged printing components, or incorrect permissions can contribute to the problem.
2. How do I fix QuickBooks Missing PDF Component on Windows 11?
Start by checking that Microsoft XPS Document Writer is enabled in Windows Features. Then run the QuickBooks Print & PDF Repair Tool, test XPS printing outside QuickBooks, and review Windows permissions if necessary.
3. Does QuickBooks Tool Hub fix PDF errors?
QuickBooks Tool Hub includes a Program Problems section with the QuickBooks Print & PDF Repair Tool. Intuit identifies this utility as one of the tools for resolving common QuickBooks PDF and printing problems.
4. Why can I print from Notepad but not QuickBooks?
A successful Notepad test suggests that basic Windows printing is working. The remaining problem may involve QuickBooks PDF components, program settings, or a specific transaction template.
5. Why does QuickBooks fail to save invoices as PDF?
Possible causes include a disabled XPS Document Writer, a QuickBooks PDF component problem, restricted TEMP folder access, or a printing service issue. Test another form to see whether the problem affects one transaction or all PDF operations.
6. Should I reinstall QuickBooks to fix a missing PDF component?
Not immediately. Try the Print & PDF Repair Tool, update QuickBooks, verify XPS functionality, and review permissions first. Consider repairing or reinstalling QuickBooks only after simpler troubleshooting steps fail.
7. Does the missing PDF component error affect QuickBooks Online?
This guide covers QuickBooks Desktop on Windows. QuickBooks Online uses a different, browser-based printing workflow, so users should follow the relevant browser and QuickBooks Online printing troubleshooting instructions.
8. Can I lose my company file while repairing PDF problems?
The PDF repair steps described here are focused on printing and document-generation functionality rather than company-file repair. Nevertheless, create a current company-file backup before performing major application repairs, reinstallations, or other system-level changes.
Conclusion
The QuickBooks Missing PDF Component error can interrupt important accounting tasks, including invoice creation, report printing, and document emailing. The most effective troubleshooting approach is to identify where the PDF workflow is failing before changing system settings.
Start with the QuickBooks Print & PDF Repair Tool, verify Microsoft XPS Document Writer, and test Windows printing outside QuickBooks. Then review TEMP folder permissions, the Print Spooler service, and transaction templates when the symptoms point to those areas.
For more QuickBooks troubleshooting resources, visit the Data Service Team. If you need assistance reviewing a QuickBooks Desktop PDF or printing issue, contact the support team at +1-(888)-718-7888.
Disclaimer
This article is intended for general educational and troubleshooting purposes. QuickBooks features, Windows settings, and available repair options may vary by product version and system configuration. Always use official Intuit, Microsoft, and software-provider resources for downloads and system repairs. Back up important accounting data before performing major software changes. Data Service Team is an independent support resource and is not affiliated with or endorsed by Intuit.
About the Author
Steven Moody writes about accounting software, bookkeeping technology, payroll workflows, and practical QuickBooks troubleshooting. His articles focus on explaining technical problems in clear language and helping readers understand the steps they can take to investigate common software issues.
For more resources, visit the Data Service Team or call +1-(888)-718-7888.