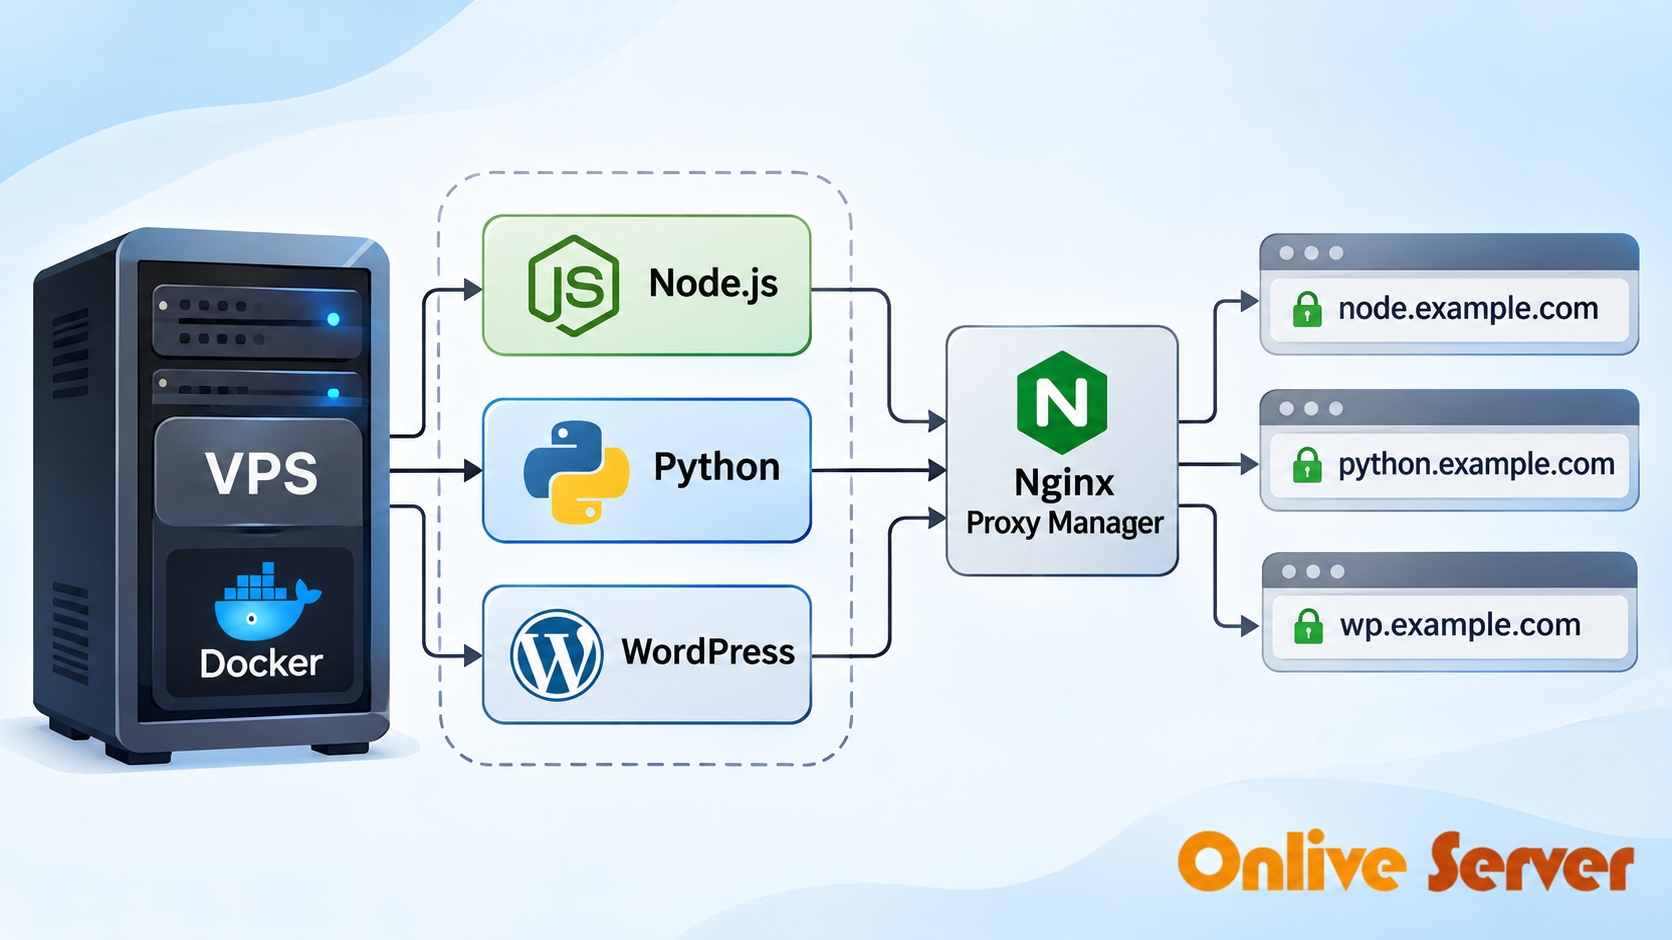
A freelance developer working on several client projects doesn't always need a separate server for each website. A single Linux VPS can run multiple applications using Docker, with each project organized in its own container.
This approach is useful for developers who need staging websites, test environments, small APIs, or temporary client demonstrations. Instead of managing several servers, they can maintain one VPS and control their applications through Docker Compose.
The important part is managing resources properly. A small VPS has limited RAM, CPU, and storage, so the applications must be configured carefully.
This guide explains how to run Docker on VPS infrastructure and deploy Node.js, Python, and WordPress applications using one public IP address.
The $10 price mentioned in the title represents an example monthly budget. It isn't a verified hosting offer, and actual VPS prices vary.
Can You Host Multiple Websites on One Budget VPS?
Yes. Docker allows several applications to run on one Linux VPS without requiring a separate operating system for each project.
For example, a freelance developer might maintain a Node.js application for one client, a Python API for another, and a WordPress staging website for a third.
Each application can use its own configuration and dependencies.
A reverse proxy receives incoming website requests and directs them to the correct container based on the requested domain.
This means several websites can share one public IP address while remaining separate applications.
A VPS with 2GB RAM may support a few lightweight staging containers, but WordPress and its database can increase memory consumption considerably.
For the three-application example in this guide, 4GB RAM is a more practical starting point. Actual capacity depends on traffic, application behavior, database activity, and background processes.
1. Prepare the Linux VPS
Start with Ubuntu 22.04 or Ubuntu 24.04 LTS and an administrator account with sudo access.
Update the installed packages:
sudo apt update
sudo apt upgrade -y
Install Docker Engine and the Docker Compose plugin using the official Docker APT repository for your Ubuntu release.
After installation, check the versions:
sudo docker --version
sudo docker compose version
Verify that Docker is running:
sudo systemctl status dockerIf necessary, start the service and enable it at boot:
sudo systemctl start docker
sudo systemctl enable docker
Create a directory for the client projects:
sudo mkdir -p /opt/client-staging
sudo chown "$USER":"$(id -gn)" /opt/client-staging
cd /opt/client-staging
Keep each application in its own directory. This makes updates, backups, and troubleshooting easier.
2. Create a Shared Docker Network
Docker networks allow containers to communicate without publishing every application port to the internet.
Create a network for the reverse proxy and staging applications:
sudo docker network create proxy-networkThe reverse proxy will use this network to reach the Node.js, Python, and WordPress containers.
For a small staging environment, this setup is convenient. For unrelated production clients, separate networks and stricter access controls provide better isolation.
3. Configure Nginx Proxy Manager
Nginx Proxy Manager is a reverse proxy with a web-based administration interface. It can route multiple domains to different containers and manage HTTPS certificates.
Create a directory:
mkdir -p /opt/client-staging/proxy
cd /opt/client-staging/proxy
Create a Compose file:
nano compose.yamlAdd the configuration:
services:
  npm:
    image: jc21/nginx-proxy-manager:2
    restart: unless-stopped
    ports:
      - "80:80"
      - "443:443"
      - "127.0.0.1:81:81"
    volumes:
      - ./data:/data
      - ./letsencrypt:/etc/letsencrypt
    networks:
      - proxy-network

networks:
  proxy-network:
    external: true
Start the service:
sudo docker compose up -dPorts 80 and 443 handle website traffic. Port 81 provides the administration interface, which is restricted to localhost in this configuration.
You can access the interface securely through an SSH tunnel:
ssh -L 8181:127.0.0.1:81 username@your-server-ipOpen the forwarded local address in your browser and follow the current Nginx Proxy Manager setup instructions.
Change the initial administrator credentials immediately.
Avoid making the administration interface publicly accessible.
4. Deploy a Node.js Application
Node.js is commonly used for APIs, dashboards, and web applications.
Create a project directory:
mkdir -p /opt/client-staging/node-app
cd /opt/client-staging/node-app
Create a file named package.json:
{
  "name": "client-node-demo",
  "version": "1.0.0",
  "private": true,
  "scripts": {
    "start": "node server.js"
  }
}
Create server.js:
const http = require("node:http");

const server = http.createServer((req, res) => {
  res.writeHead(200, {
    "Content-Type": "text/plain"
  });

  res.end("Node.js staging application");
});

server.listen(3000, "0.0.0.0");
Create a Dockerfile:
FROM node:22-alpine

WORKDIR /app

COPY package.json ./
COPY server.js ./

USER node

EXPOSE 3000

CMD ["node", "server.js"]
Create the Compose file:
services:
  node-app:
    build: .
    restart: unless-stopped
    expose:
      - "3000"
    networks:
      - proxy-network

networks:
  proxy-network:
    external: true
Build and start the application:
sudo docker compose up -d --buildThe application now runs on port 3000 inside the Docker network.
It doesn't need a public port because Nginx Proxy Manager can forward requests directly to the container.
5. Deploy a Python Application
Python applications can run alongside Node.js without sharing their dependencies.
Create a directory:
mkdir -p /opt/client-staging/python-app
cd /opt/client-staging/python-app
Create requirements.txt:
Flask>=3.0,<4.0
gunicorn>=22,<24
These version ranges are for demonstration. Production projects should use reviewed and pinned dependency versions.
Create app.py:
from flask import Flask

app = Flask(__name__)

@app.get("/")
def home():
    return "Python staging application"
Create a Dockerfile:
FROM python:3.12-slim

WORKDIR /app

COPY requirements.txt .

RUN pip install --no-cache-dir -r requirements.txt

COPY app.py .

RUN useradd --create-home appuser

USER appuser

EXPOSE 8000

CMD ["gunicorn", "--bind", "0.0.0.0:8000", "app:app"]
Create compose.yaml:
services:
  python-app:
    build: .
    restart: unless-stopped
    expose:
      - "8000"
    networks:
      - proxy-network

networks:
  proxy-network:
    external: true
Start the container:
sudo docker compose up -d --buildThe Python application is available to the reverse proxy through port 8000 on the shared Docker network.
6. Deploy WordPress with MariaDB
WordPress needs persistent storage and a database. It generally requires more resources than the simple Node.js and Python examples.
Create a project directory:
mkdir -p /opt/client-staging/wordpress
cd /opt/client-staging/wordpress
Create an environment file:
nano .envAdd strong, unique passwords:
DB_ROOT_PASSWORD=replace-with-a-strong-root-password
DB_PASSWORD=replace-with-a-strong-wordpress-password
Restrict access to the file:
chmod 600 .envCreate compose.yaml:
services:
  db:
    image: mariadb:11.4
    restart: unless-stopped
    environment:
      MARIADB_ROOT_PASSWORD: ${DB_ROOT_PASSWORD}
      MARIADB_DATABASE: wordpress
      MARIADB_USER: wordpress
      MARIADB_PASSWORD: ${DB_PASSWORD}
    volumes:
      - db_data:/var/lib/mysql
    networks:
      - wordpress-backend

  wordpress:
    image: wordpress:php8.3-apache
    restart: unless-stopped
    depends_on:
      - db
    environment:
      WORDPRESS_DB_HOST: db:3306
      WORDPRESS_DB_USER: wordpress
      WORDPRESS_DB_PASSWORD: ${DB_PASSWORD}
      WORDPRESS_DB_NAME: wordpress
    volumes:
      - wordpress_data:/var/www/html
    expose:
      - "80"
    networks:
      - wordpress-backend
      - proxy-network

volumes:
  db_data:
  wordpress_data:

networks:
  wordpress-backend:
    internal: true
  proxy-network:
    external: true
Start the containers:
sudo docker compose up -dThe WordPress application can communicate with MariaDB through the private backend network.
MariaDB doesn't publish a port to the public internet.
The named volumes preserve application and database files when containers are recreated. They don't replace proper backups.
For real client projects, configure database health checks, resource limits, backup schedules, and tested recovery procedures.
7. Route Multiple Domains Through One IP Address
A reverse proxy makes it possible to host several websites on a single public IP address.
For this example, imagine three staging domains:
node.example.comfor Node.jspython.example.comfor Pythonwp.example.comfor WordPress
These are documentation-only example domains, not real websites.
In your DNS management panel, point the A record for each actual domain to the VPS public IPv4 address.
Then create three proxy hosts in Nginx Proxy Manager.
For Node.js, use the container hostname node-app and port 3000.
For Python, use python-app and port 8000.
For WordPress, use wordpress and port 80.
All three proxy hosts should use HTTP for their internal connections in this example.
Nginx Proxy Manager handles the public-facing HTTPS connection.
This arrangement allows one VPS to serve several domains without exposing each application's internal port.
8. Configure HTTPS Certificates
HTTPS protects traffic between visitors and the website.
Nginx Proxy Manager supports certificate requests through Let's Encrypt, so a separate Certbot installation isn't required for this configuration.
Before requesting certificates, confirm that the domains point to the correct VPS IP address.
Ports 80 and 443 must be accessible where required for HTTP validation and HTTPS traffic.
Open each proxy host in Nginx Proxy Manager, select its SSL settings, request a certificate, and enable HTTPS.
For staging websites, consider access restrictions as well. HTTPS encrypts traffic but doesn't prevent unauthorized visitors from opening a publicly accessible staging environment.
If you prefer configuration files over a graphical dashboard, Traefik is another reverse proxy that supports Docker-based routing and automated certificate management.
9. How Many Websites Can Run on a 2GB VPS?
The number depends on what the websites actually do.
A 2GB VPS may be enough for a reverse proxy and a couple of small staging applications with little traffic.
WordPress and MariaDB consume additional memory. Running them alongside Node.js, Python, and a reverse proxy can put significant pressure on a small server.
For this complete three-application example, 4GB RAM is a more comfortable starting point, although it isn't a guarantee of performance.
Monitor available memory:
free -hCheck container resource consumption:
sudo docker statsInspect disk space:
df -hIf memory usage is consistently high, consider stopping unused staging environments, reducing unnecessary background processes, or upgrading the VPS.
Docker supports container memory limits, but setting them too aggressively can cause applications to fail or restart.
Use observed resource consumption rather than assigning arbitrary limits.
10. Manage Client Projects Separately
Each client project should have its own application directory, Compose configuration, and deployment process.
This helps prevent accidental changes to unrelated websites.
To rebuild the Node.js application:
cd /opt/client-staging/node-app
sudo docker compose up -d --build
To check its logs:
sudo docker compose logs --tail=50To restart the Python application:
cd /opt/client-staging/python-app
sudo docker compose restart
To view running containers:
sudo docker psAvoid updating every container automatically without testing compatibility.
For WordPress, back up both the database and application files before making significant changes.
A shared VPS also creates a shared point of failure. If the server becomes unavailable, all applications hosted on it may be affected.
For unrelated production clients, separate VPS instances can offer stronger isolation and more predictable resource allocation.
11. Common Problems When Running Docker on a Budget VPS
Containers Restart Repeatedly
Check the logs:
sudo docker compose logs --tail=100Look for application errors, missing environment variables, unavailable dependencies, or memory-related failures.
Website Returns a 502 Error
A reverse proxy may return a 502 response when it cannot reach the application container.
Check whether the container is running and confirm that the proxy hostname and port match the Compose configuration.
Both the proxy and the application must be connected to the appropriate Docker network.
VPS Runs Out of Memory
Check system memory and container usage.
If the WordPress database or application processes consume too much memory, reduce unnecessary workloads or increase available resources.
HTTPS Certificate Request Fails
Confirm that the domain points to the correct public IP address.
Check whether the required ports are accessible and whether another service is already using ports 80 or 443.
Certificate requests also depend on successful domain validation.
Is a Budget Docker VPS Worth It for Freelancers?
A budget Linux VPS can be a useful workspace for freelance developers who manage several small websites or client staging environments.
Docker Compose keeps projects organized, while Nginx Proxy Manager routes multiple domains through one public IP address.
The approach works best when resource consumption is monitored and applications are kept separate.
For lightweight development projects, one VPS may be sufficient. As client traffic, database activity, or security requirements increase, moving individual applications to separate environments becomes a sensible next step.