
Getting your first email backup set up doesn’t need to become a complicated project. Start with one mailbox, create one clear profile, run the backup, and check what was actually saved. Once that works, you can add other accounts and policies without having to untangle several settings at the same time. And all of this is possible with the help of simple yet powerful email backup software called Mail Backup X.
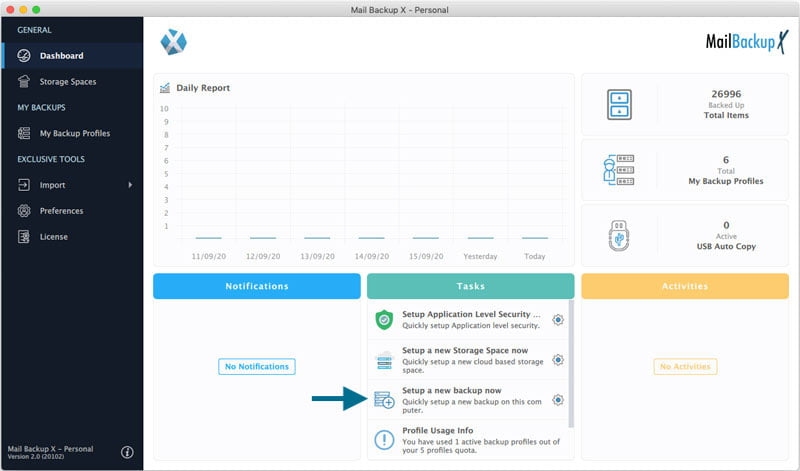
Mail Backup X keeps the source, folders, destination, schedule, and other settings together in a profile. That gives you a clear place to manage each backup, and it also makes troubleshooting easier later.
Step by Step Guide on Using the Email Backup Software
Step 1: Choose the source
Open Mail Backup X and choose the option to set up a new backup profile. Select the source that matches the mailbox you want to protect. This could be a mail server such as Gmail, Microsoft 365, Exchange, or another IMAP service, or a desktop source such as Outlook or Apple Mail.
For services that use OAuth, follow the secure sign in window and grant the requested backup permissions. For a traditional mail server, enter the provider’s host, port, and authentication details.
Start with one account and make sure the connection works before moving on.
Step 2: Select what belongs in the archive
Once the source is connected, Mail Backup X shows the available folder or label structure. Go through it and select the folders you actually need. Include Inbox and Sent, along with any project, client, or other folders that you would need during a recovery.
Think about the less obvious folders separately. Drafts, Trash, Spam, contacts, calendars, and local only folders may or may not belong in your archive, depending on what you need to recover later.
A focused selection also keeps the first email backup smaller and makes the archive easier to search. You can always create another profile later if a different set of folders needs its own backup policy.
Next, click ‘Continue’ to go to the profile settings window. Here you will have to adjust several parameters of the profile. We will discuss the essential ones below.
Step 3: Choose a destination
Choose where the email backups will be stored. Use a destination that you control and can access when you need to recover an email.
A local drive is convenient when you want fast access to the archive, while a cloud drive, FTP location, or external disk can give you another storage option.
For an important mailbox, set up a mirror or USB snapshot after the primary destination is working properly. Give the folder a useful name that tells you which account it belongs to and what the profile is for. Names such as “Email Backup 1” don’t tell you much when you have several accounts to manage.
Take your time. The storage decision is worth making carefully at this stage because moving archives around later can add unnecessary work.
Step 4: Set the schedule
For an active mailbox, choose Automatic or a recurring interval that matches how often new emails arrive. A busy mailbox may need more frequent backups, while an account that changes very little can use a longer interval.
If you’re backing up a static archive before a migration, Manual may be more appropriate. Run the backup when you’re ready and keep the profile available for another run if the archive changes.
Mail Backup X is designed to continue incrementally after the initial run, so a frequent schedule doesn’t mean the entire mailbox has to be copied again each time. Give the first backup enough time to finish, though. It can take considerably longer than the later runs.
Step 5: Protect the archive
Decide how much protection the archive needs before you start storing real email in it. If the mailbox contains personal, financial, legal, or business sensitive information, enable the secure archive option.
If you use an additional personal encryption key, store it in a password manager or another approved recovery location. Keep it separate from the archive and don’t send it to yourself by email. More importantly, check that you can actually retrieve the key before you need to restore an email. A protected archive is of little use if the person responsible for recovery cannot access the key.
Step 6: Run the backup and inspect the result
Now save the profile and start the first email backup.
Watch the progress in the dashboard and, when the job finishes, open the profile log. Check for errors, skipped folders, authentication warnings, or problems writing to the destination.
Then go one step further and look at the data itself. Choose View Data and search for a known message. Open an attachment and check the date, sender, and folder placement. These checks only take a few minutes, but they tell you much more than a completed progress bar does.
If something is missing, fix it now while you still know exactly what you changed.
Use the Email Backup profile as a repeatable unit
Once your first profile is working, if you have another email client or account, use the same approach to set up back up for that as well. Mail Backup X is a versatile email backup software that allows adding unique and separate profiles. Each profile keeps the source, selected folders, destination, schedule, and related settings together, so each account can have its own clearly defined setup.
When you need a different backup policy, create a separate profile rather than putting too many requirements into one. For example, you could use a frequent encrypted cloud profile for current mail and a manual local profile for a legacy archive.
Keep the interface simple as your Email Backup setup grows
As you add profiles, give them names that tell you whose data they contain, which source they use, and what they are intended for. A useful name saves time later, particularly when you’re looking at several profiles in the dashboard or trying to find the right log.
Review the dashboard regularly, but make changes deliberately. Don’t alter schedules or folder selections without knowing why the change is needed, especially on profiles that are already working reliably.
When you retire a profile, first make sure its archive files are preserved. Mail Backup X notes that deleting a profile does not automatically delete the archive from its storage location, so handle the profile and the stored archive as two separate things. Remove old storage only after you’ve decided that the data is no longer required.
Troubleshoot Email Backup Problems in the Right Order
When an email backup fails, resist the temptation to change several settings at once. Start with the profile log, which usually gives you the clearest indication of where the problem occurred. From there, check the source connection and confirm that you can still sign in, then make sure the selected folders are available, the destination can be written to, and there’s enough free space.
If you’re backing up Apple Mail on a newer version of macOS, also check that Mail Backup X has the required disk access permission. Once you identify the likely cause, correct that one issue and run the profile again. Check the result in View Data and, if the backup succeeds, you’ll know exactly what resolved the problem.
Reliable email backups come from a process you can understand and repeat. Start with one mailbox, verify the archive, test a small restore, and then apply the same approach to additional accounts. This makes troubleshooting much easier as your backup setup grows.
The free trial version of Mail Backup X gives you an opportunity to test this process with your own email setup before making a purchase. That hands-on experience helps you judge whether the email backup software fits the way you actually need to protect your emails.
Download full version to backup Email Easily on Apple mail client :- www.mailbackupx.com/email-backup/